Home | Contact |
Check Valves | Regulator kits
Safety Valves

Air Compressor Pressure Switch Leaks Air After Shutting Off
If your air compressor pressure switch leaks air after it shuts off, the problem is often the tank check valve. The check valve lets air into the tank, then stops tank pressure from flowing back toward the pump and pressure switch.One sign of a bad check valve is air hissing from the small tube or fitting on the side of the pressure switch after the compressor shuts off.A small hiss for a few seconds can be normal if it’s coming from the pressure switch unloader. But if air keeps leaking after shutdown, the check valve may not be sealing.Where is my check valve?
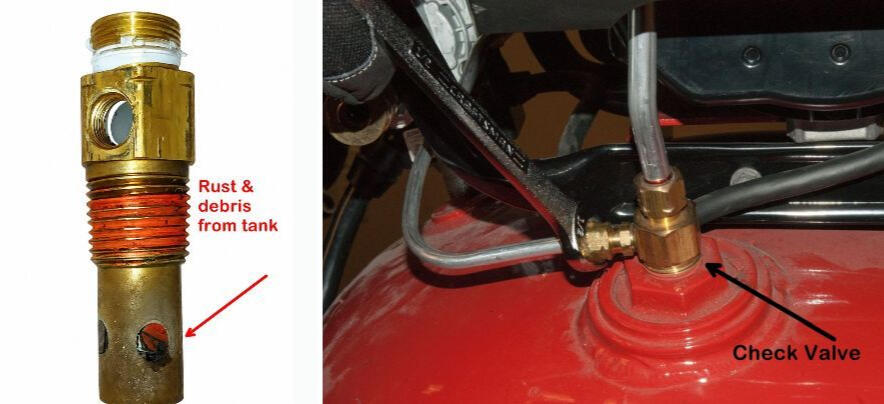
Think of your check valve like an iceberg. Most of it is hidden. The important part is actually inside your air tank.Air flows from the pump head through a supply tube, then into the top of the check valve. The top may look like a simple brass nut or fitting, but it is not just a nut. It is the visible top of the check valve as seen in the image on the right below.Most of the check valve threads into the tank, where moisture and rust can damage it over time as seen in the image on the left below.
A few of our available replacement Check Valves
How to install an air compressor check valve
Turn off and unplug your air compressor. (In other words, kill the power!)
Drain ALL of the air pressure from your air compressor tank. (unless you want a missile being launched into the ceiling)
Follow the air supply tube from your pump head and find where it enters your tank. There should be a brass compression nut around the tube which connects to threads protruding from your air tank.
Loosen and remove this supply tube from the check valve.
Using an appropriately sized socket, remove the check valve from the tank.
Now you have removed your rusty and defective check valve causing you all of your problems.
Install thread sealant on the new check valve (if sealant is not supplied on the check valve) and carefully thread it into the tank.
Tighten the check valve snug, but do not overtighten.
Reverse the steps above to complete.